ATTACH2CLOUD | How to register Attach2Cloud as a Microsoft Entra application
INTEGRATION OUTLOOK - ONEDRIVE, SHAREPOINT ONLINE, AND TEAMS INTEGRATION
Step-by-step Tutorial:
We have done everything possible to simplify and automate the process of registering Attach2Cloud in Microsoft Entra, and to ensure that this tutorial is easy to understand, even for those who are not experts in Microsoft Entra.
Registering Attach2Cloud in Entra should therefore only take a few minutes, not hours.
That said, the world of Microsoft 365 can sometimes have its surprises. So, if you run into any issues or need clarification before getting started, please don’t hesitate to contact us—we’re always happy to help!
The Attach2Cloud Team
This tutorial includes the following sections:
1. Prerequisites
2. Launch PowerShell as administrator and update the Graph module
3. Copy these 2 files (please ask us to obtain them) in the Attach2Cloud program folder
4. Run the Attach2Cloud registration A2C-Register-v3.ps1 script
5. About the A2C-EncryptAADSSOParameters.exe program
6. Using A2C-EncryptAADSSOParameters.exe program to grant the requested permissions to the Attach2Cloud Entra application
7. Using A2C-EncryptAADSSOParameters.exe program to encrypt the Attach2Cloud Entra application parameters
8. Testing
9. Deploying your Attach2Cloud Entra application parameters
10. Ah, one or two last things before you close this tutorial!
1. Prerequisites
Following this tutorial to register Attach2Cloud as a Microsoft Entra application requires the following prerequisites:
- A computer with Attach2Cloud installed
- An account with rights to copy files in the Attach2Cloud program folder (C:\Program Files\MK Net Work\Attach2Cloud), to add parameters to the registry HKEY_LOCAL_MACHINE hive, and to run PowerShell as Administrator
- A MS 365 administrator account with rights to register applications in Microsoft Entra
- These 2 files (please ask us to obtain them), to be copied in the Attach2Cloud program folder:
A2C-EncryptAADSSOParameters.exe
A2C-Register-v3.ps1
2. Launch PowerShell as administrator and update the Graph module
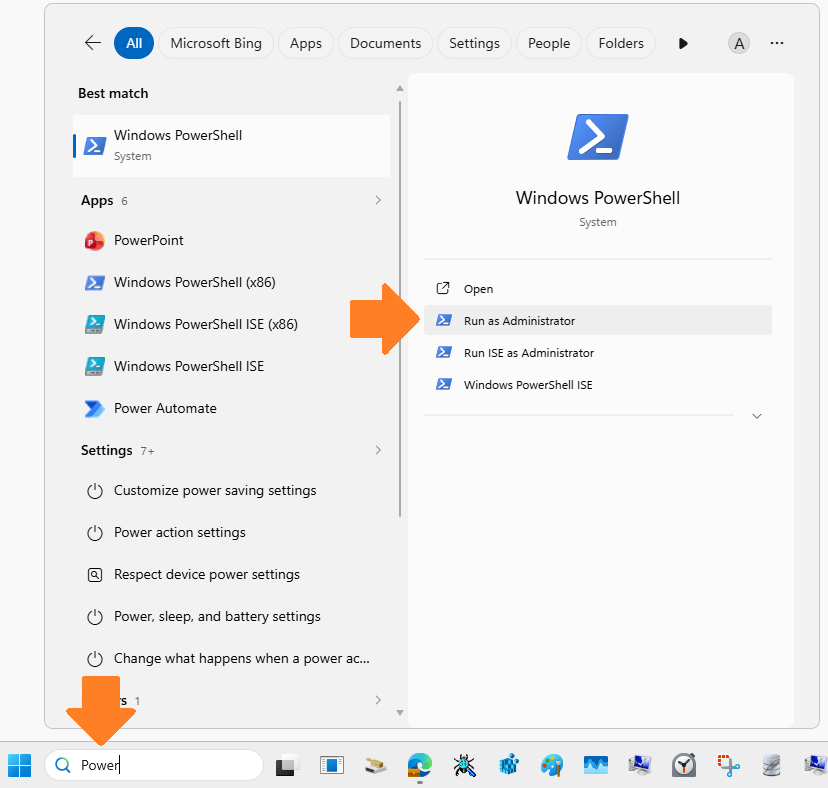
To launch PowerShell as administrator, type PowerShell in the Windows Search Bar and select Run as Administrator:
Enter the 2 commands below in the PowerShell window:
The first one is to uninstall any previous Graph module.
(It may display an error if no Graph module was installed in the past. This is not a problem):
Get-InstalledModule Microsoft.Graph* | Uninstall-Module -Force -AllVersions
The second one is to install the current version of the Graph module.
It could take very long time (like several minutes) before and after the module installer progress bars have completed.
Thus, don’t think it is broken and make sure to wait until completion:
Install-Module Microsoft.Graph -Scope AllUsers -Force
3. Copy these 2 files (please ask us to obtain them) in the Attach2Cloud program folder
A2C-EncryptAADSSOParameters.exe
A2C-Register-v3.ps1
Tip:
The Attach2Cloud program folder is:
C:\Program Files\MK Net Work\Attach2Cloud
4. Run the Attach2Cloud registration A2C-Register-v3.ps1 script
First, check that Script execution is allowed in PowerShell by entering the following command:
Get-ExecutionPolicy
If it returns anything other than:
Unrestricted
Copy the returned string (for example Restricted) in the notepad, so you will be able to restore it later.
Then enter this command in your PowerShell window and confirm it when asked by answering Yes:
Set-ExecutionPolicy -ExecutionPolicy Unrestricted
Execute the A2C-Register-v3.ps1 script by entering these commands in your PowerShell window:
C:
cd "C:\Program Files\MK Net Work\Attach2Cloud"
.\A2C-Register-v3.ps1
Tip:
The PowerShell script will ask you to Authenticate to MS 365 as a Entra admin (if you are a Global Administrator this is of course OK) and not as the current Attach2Cloud user.
Thus, in order to avoid authentication issues, you should check if a user other than the Entra admin is currently authenticated ion the browser (by launching the browser and opening office365.com). If a MS 365 user other than the Entra admin is currently connected, disconnect him/her and close the browser.
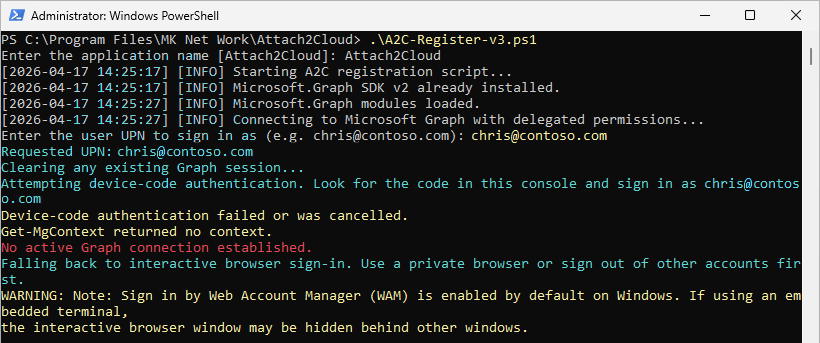
This is the script output, as you can see it (generally) manages to authenticate via the browser:
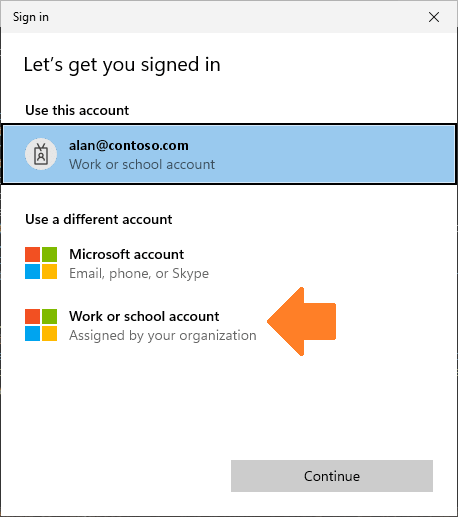
The script automatically displays this sign-in dialog, if the pre-selected user is not the Entra admin, select Work or School account:
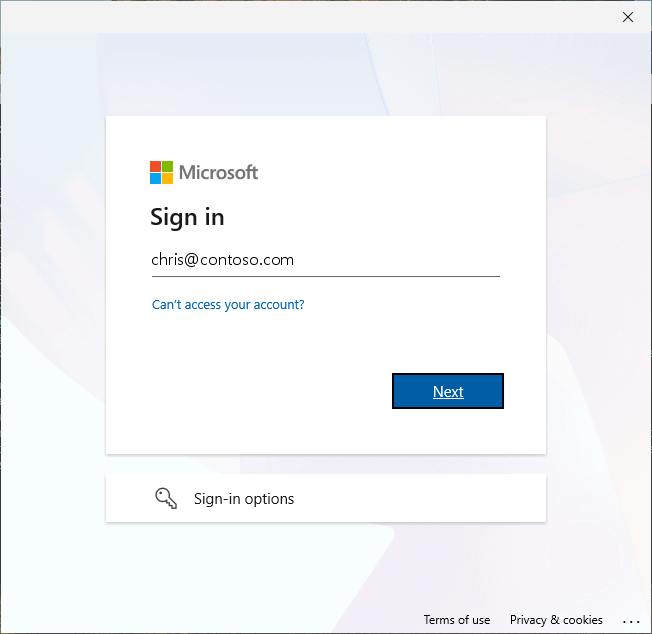
Then sign with the Entra admin account:

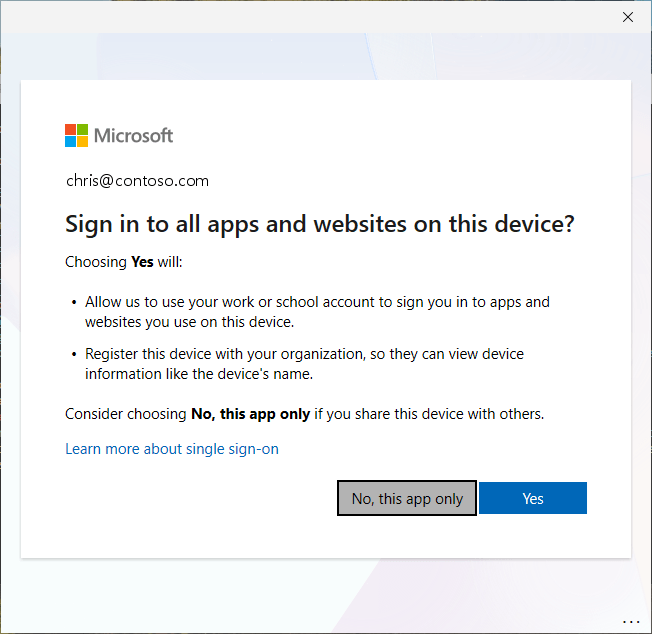
Select No, this app only in the below dialog to avoid using the Entra account for other purposes:
Tip:
In case you take too much time to sign-in (for instance if you enter a wrong password, or if you wait for too long to enter a MFA code if any, the PowerShell window sometimes closes itself automatically.
Simply retry and try to sign-in as quickly as possible.
This is maybe a security built inside the PowerShell Graph module.
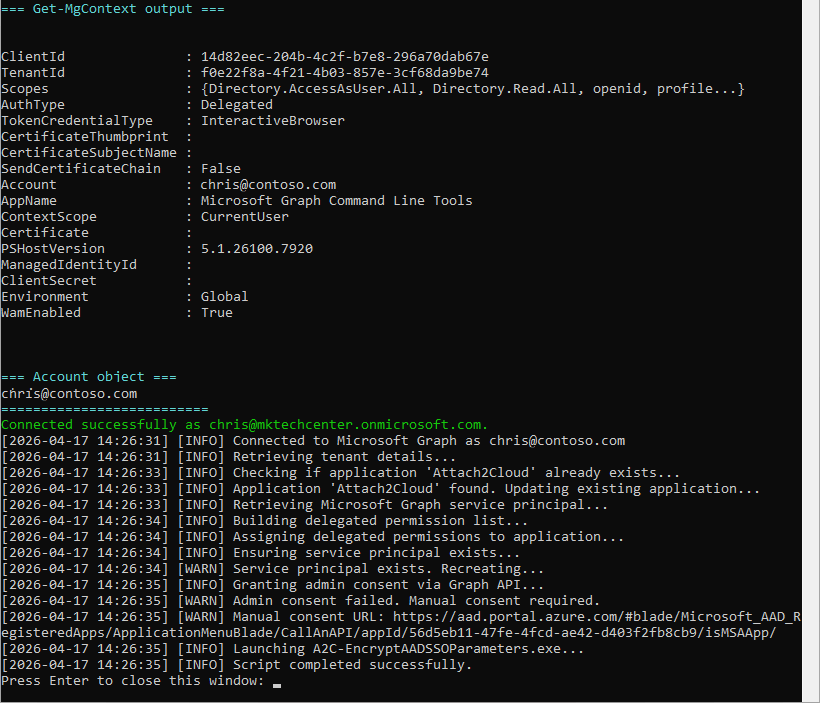
Once you complete the sign-in, the PowerShell script starts registering Attach2Cloud in Entra and displays the following output:
You may get an additional dialog asking to accept granting these permissions to the application:
If so, click Accept. Anyway, as you can see in the above script output:
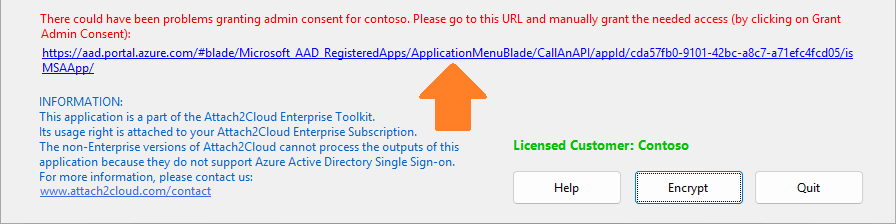
[2026-04-18 19:50:27] [INFO] Granting admin consent via Graph API...
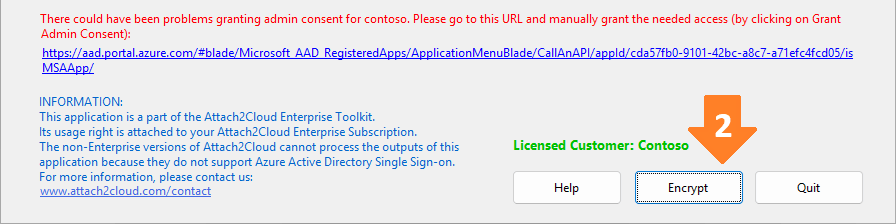
[2026-04-18 19:50:27] [WARN] Admin consent failed. Manual consent required.
[2026-04-18 19:50:27] [WARN] Manual consent URL: https://aad.portal.azure.com/#blade/Microsoft_AAD_RegisteredApps/ApplicationMenuBlade/CallAnAPI/appId/cda57fb0-9101-42bc-a8c7-a71efc4fcd05/isMSAApp/
The admin consent fails and you will have to manage it manually in the next steps. The reason we try to set the application permissions via the script is that it allows to retrieve the Manual consent URL (that will be used in next step by A2C-EncryptAADSSOParameters.exe, automatically launched by the script).
5. About the A2C-EncryptAADSSOParameters.exe program
The last instruction of the A2C-Register-v3.ps1 script launches the A2C-EncryptAADSSOParameters.exe program:
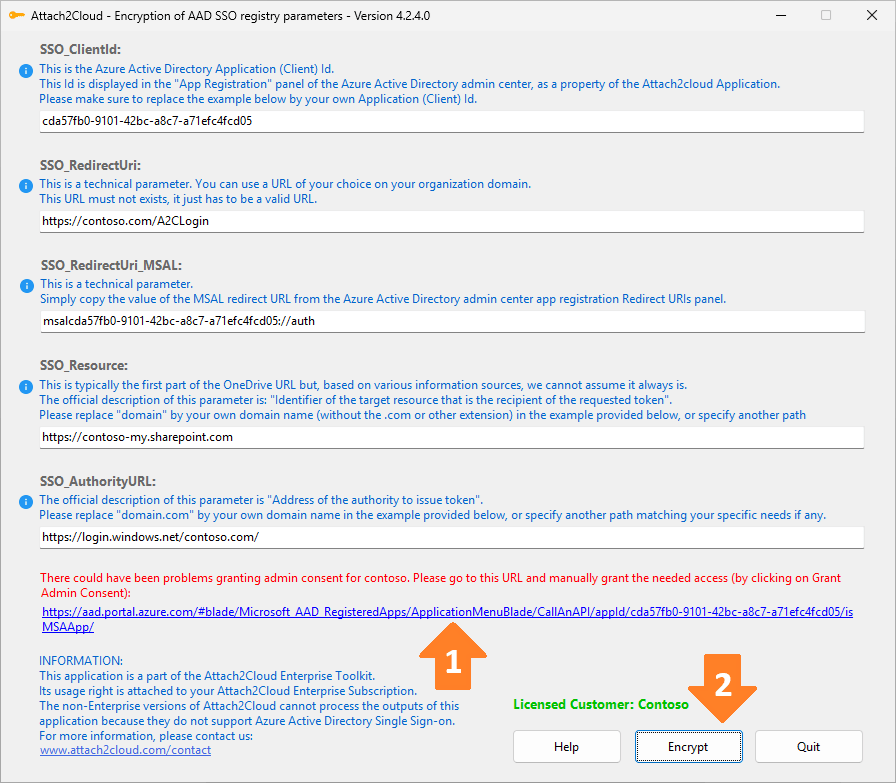
Your settings differ from those shown in the screenshot above, which are provided for illustrative purposes only.
Do not copy the settings from the screenshot above; keep your own settings.
A2C-EncryptAADSSOParameters.exe has 3 purposes:
- The first one (1) is to allow you to grant the requested permissions to the Attach2Cloud Entra application by simply clicking the link provided at the bottom of its window.
- The second one (2) is to encrypt (*) the five Attach2Cloud Entra application parameters displayed in its window. (The PowerShell script has entered automatically the good values for these five parameters, so you do not have to modify them). These parameters are needed by Attach2Cloud and must be provided in the Attach2Cloud user registry, it is thus better to encrypt them.
- The third goal of A2C-EncryptAADSSOParameters.exe is to generate 2 files:
- a .REG file containing the encrypted parameters ready to be imported in the Attach2Cloud registry.
You can thus test immediately the registration of Attach2Cloud in Entra by importing this .REG file and running Outlook + Attach2Cloud. - a TXT file for your documentation, containing the five parameters, in clear and encrypted.
- a .REG file containing the encrypted parameters ready to be imported in the Attach2Cloud registry.
(*) WARNING - if you are a reseller or a service provider managing several Attach2Cloud customers:
The encryption of the Attach2Cloud parameters is performed partly based on the content of the customer license file residing in the Attach2Cloud Program folder.
Thus, you have to make sure that for a given customer, their parameters are encrypted using A2C-EncryptAADSSOParameters.exe with an installed version of Attach2Cloud obtained through their own Attach2Cloud subscription.
6. Using A2C-EncryptAADSSOParameters.exe program to grant the requested permissions to the Attach2Cloud Entra application
Before you start granting delegated permissions to your Attach2Cloud Entra application, let's take a minute to see how delegated permissions work.
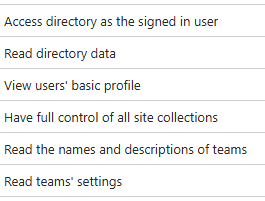
When you grant these required delegated permissions to your Entra Attach2Cloud application:
You are of course not granting full control to the application. For example, you are not granting the application user "full control of all sites collections"
With delegated permissions, the application user will only have the permissions that he/she actually has when not using the app.
User's permissions when using your Attach2Cloud Entra application result from the intersection of the user's permissions and the application's permissions, represented by the green area in the diagram below:
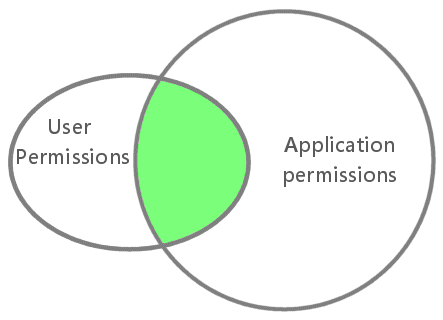
This means that the Attach2Cloud Entra application can never have more privileges than the signed-in user.
More details on this topic can be found here:
https://docs.microsoft.com/en-us/graph/auth/auth-concepts
Now that this point has been clarified and you feel confident about granting delegated permissions to your Attach2Cloud Entra application, let’s get started.
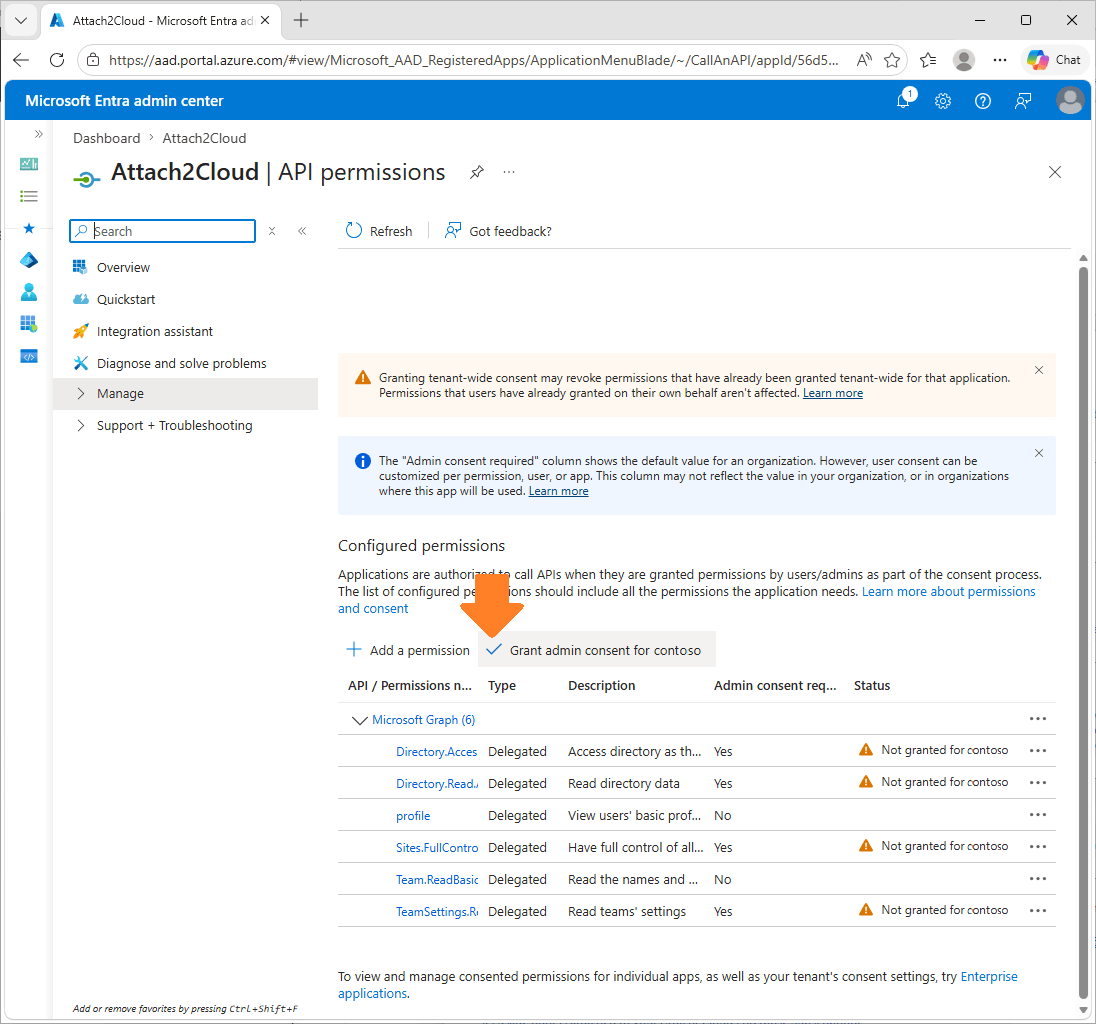
Click the link displayed at the bottom of the A2C-EncryptAADSSOParameters.exe window:
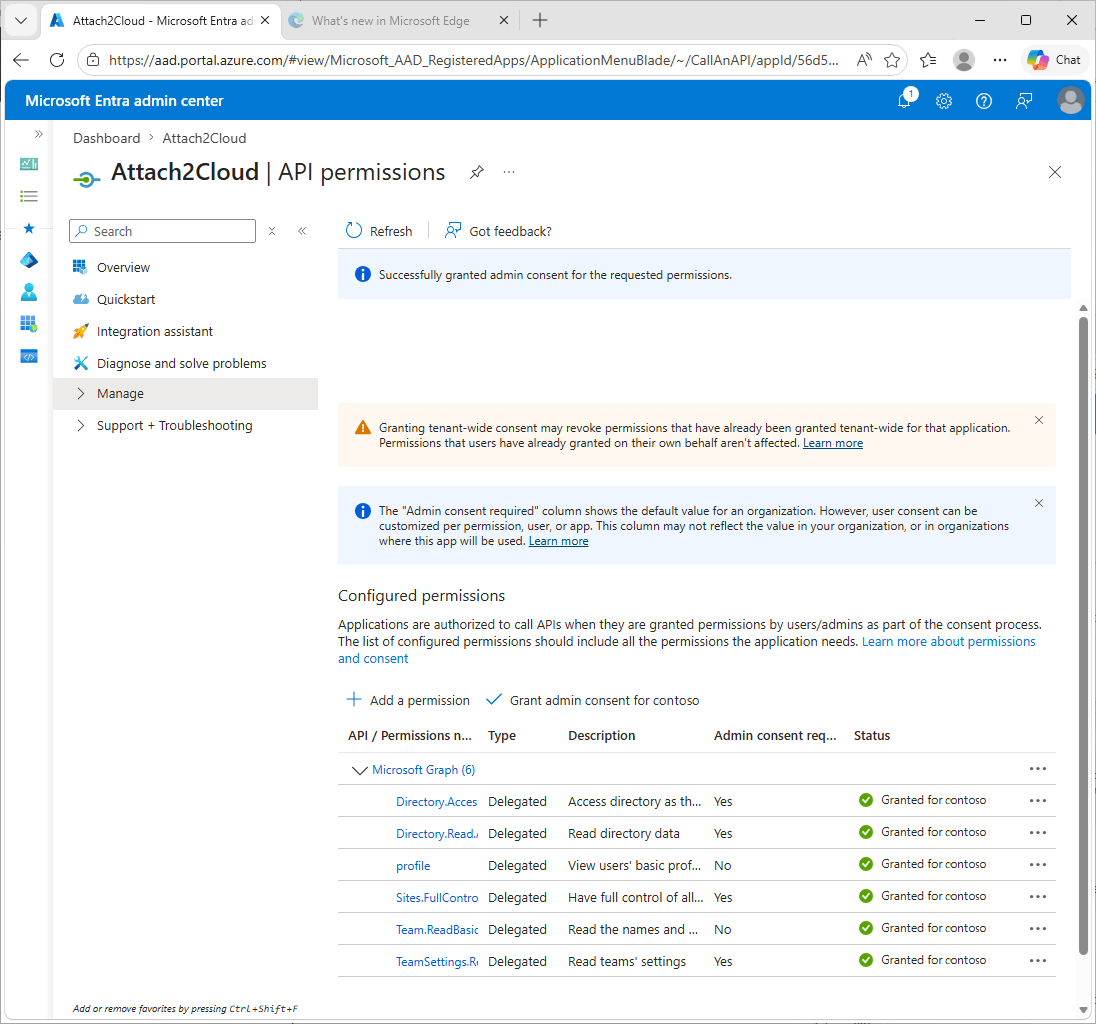
It opens the Microsoft Entra admin center on this page below.
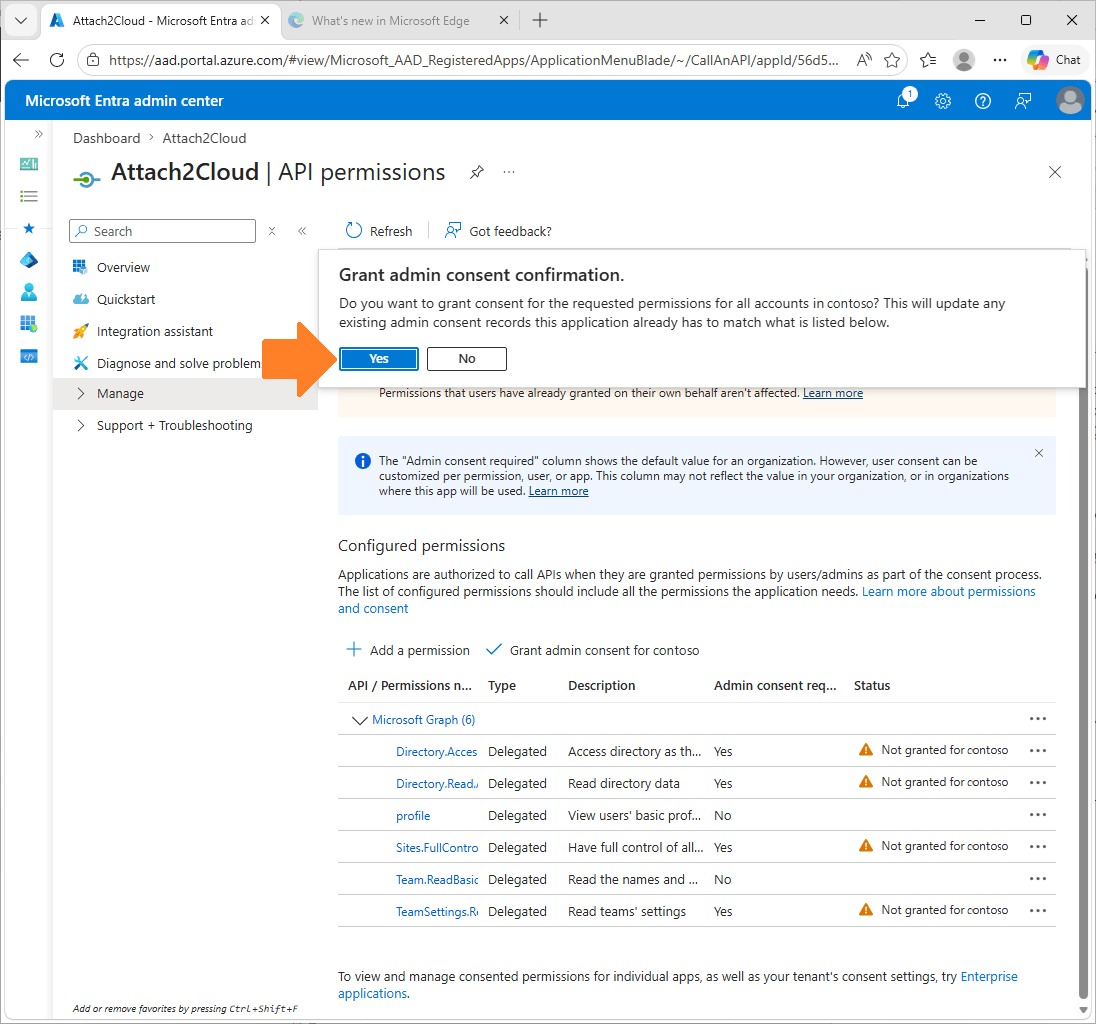
In this window, click the Grant admin consent button:
Click the link displayed at the bottom of the A2C-EncryptAADSSOParameters.exe window. It will open the Microsoft Entra admin center on this page:
Click the link displayed at the bottom of the A2C-EncryptAADSSOParameters.exe window. It will open the Microsoft Entra admin center on this page:
7. Using A2C-EncryptAADSSOParameters.exe program to encrypt the Attach2Cloud Entra application parameters
Click the Encrypt button displayed at the bottom of the A2C-EncryptAADSSOParameters.exe window:
Select the SSO Option 3 (MSAL) option box:
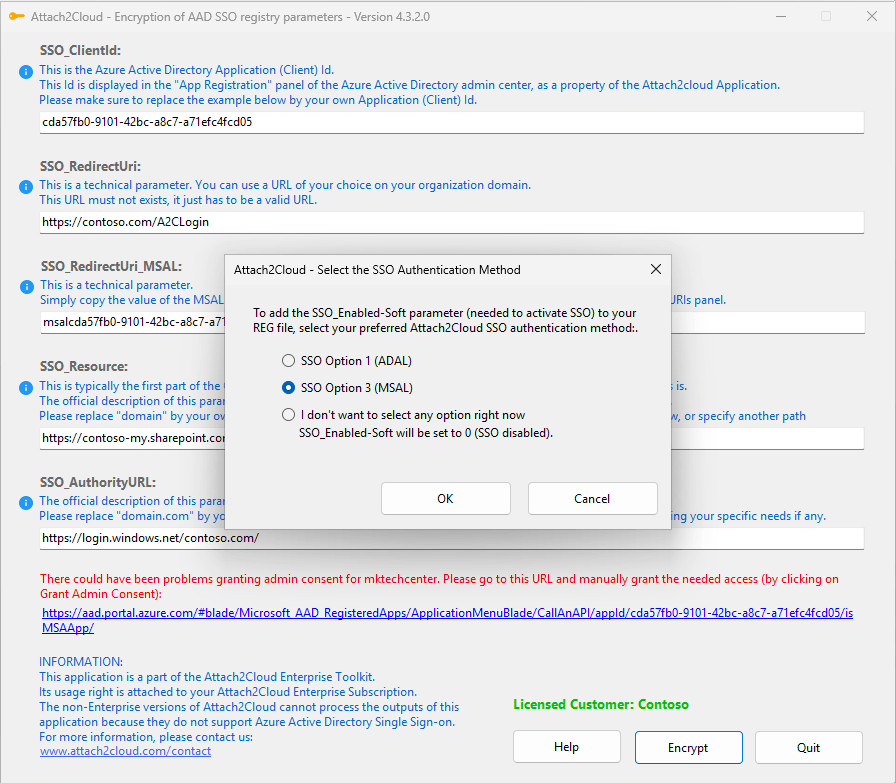
Your settings differ from those shown in the screenshot above, which are provided for illustrative purposes only.
Do not copy the settings from the screenshot above; keep your own settings.
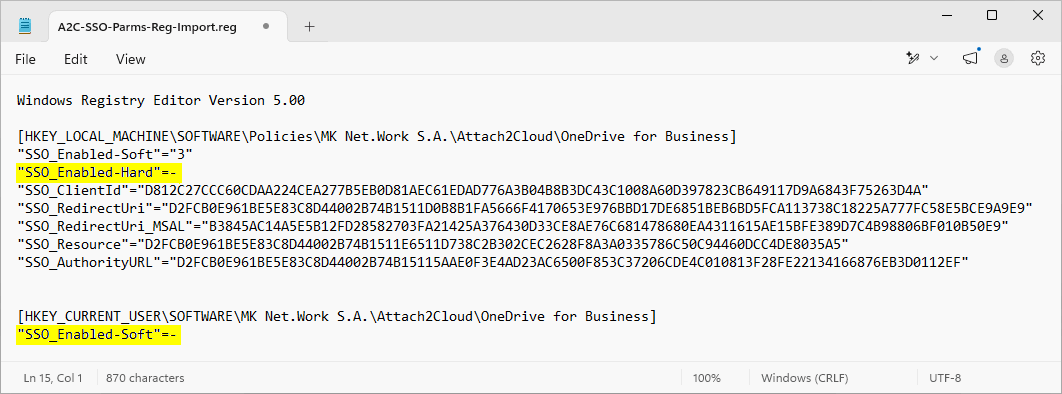
A2C-EncryptAADSSOParameters.exe has generated a ready-to-import REG file and a TXT file for your documentation:
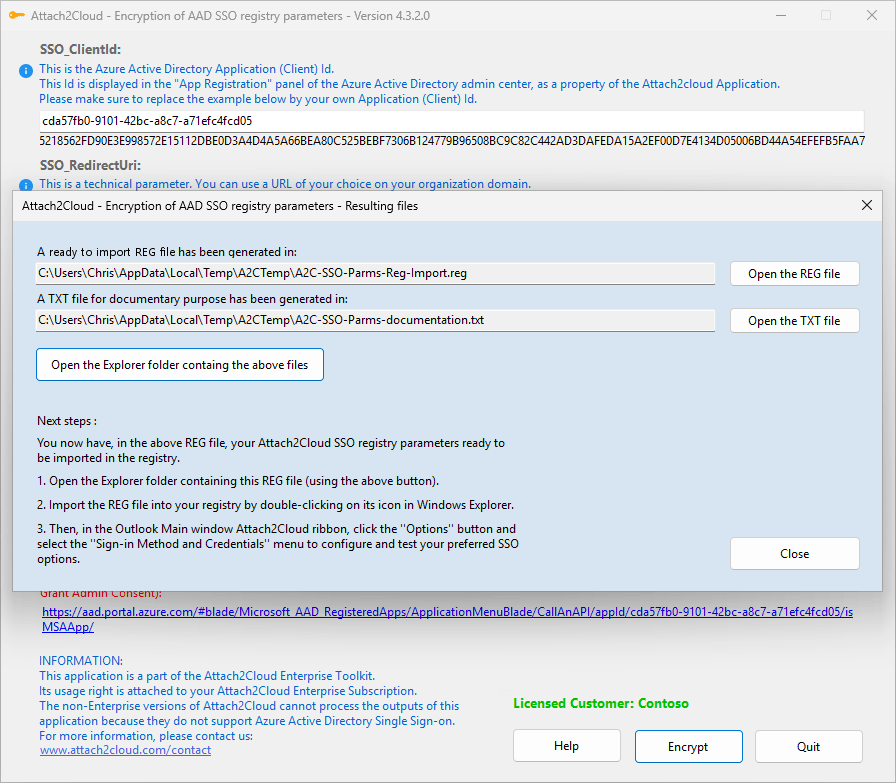
This is the REG file:
Your settings differ from those shown in the screenshot above, which are provided for illustrative purposes only.
Do not copy the settings from the screenshot above; keep your own settings.
See the 2 parameters highlighted in Yellow in the above screenshot?
As you noticed, their values (the minus sign) are NOT between quotes.
In this ready-to-import in the registry REG file, this means "delete the parameter if exists".
If you import this REG file in a GPO or in other distribution tools, make sure this is well interpreted.
Double check that you are not setting these parameters to "-" (minus sign between quotes) because it would have for effect to create them and to set them to the "-" value.
And this is NOT wat we want.
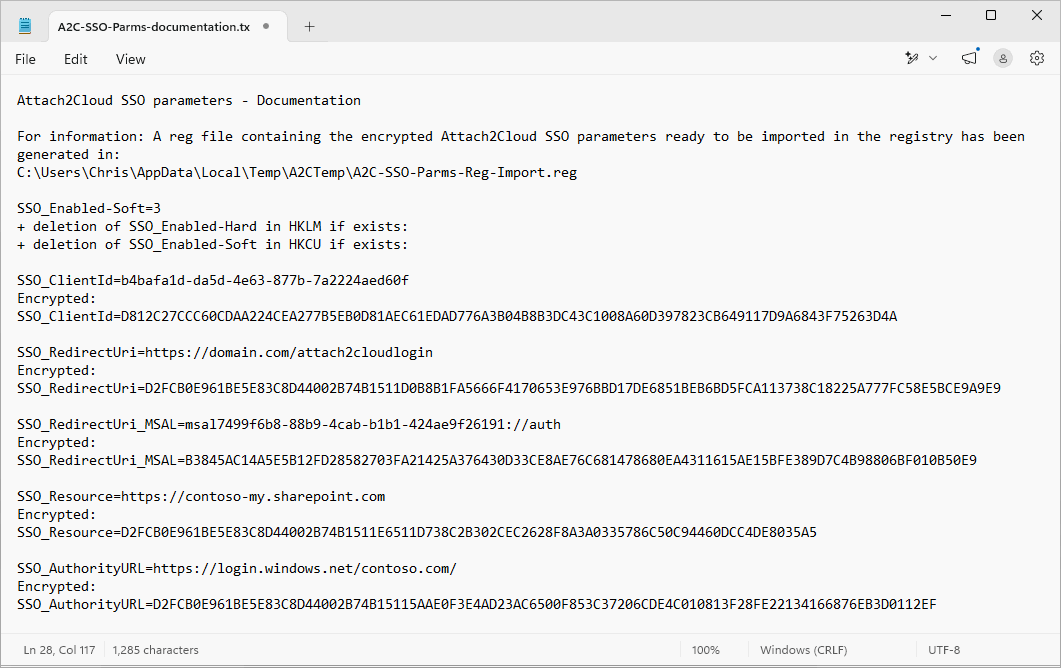
This is the TXT file:
Your settings differ from those shown in the screenshot above, which are provided for illustrative purposes only.
Do not copy the settings from the screenshot above; keep your own settings.
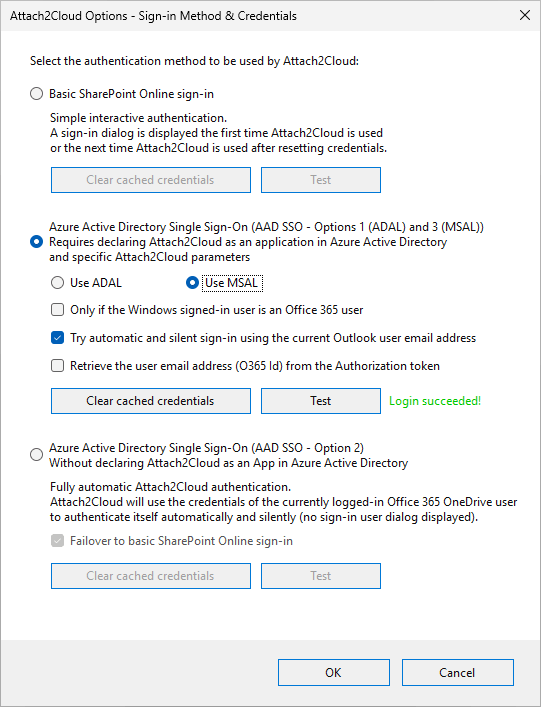
8. Testing your Attach2Cloud Entra application parameters
Import the resulting REG file in the registry of an Attach2Cloud user.
Since these registry parameters are located in HKEY_LOCAL_MACHINE, the import may require admin rights.
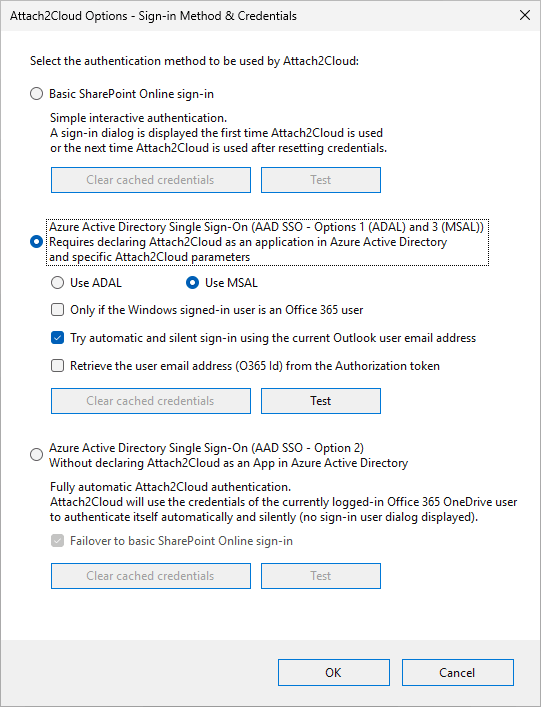
Once you have imported your REG file, you can check that everything is OK by running Outlook and clicking the Options / Authentication methods menu in the Attach2Cloud ribbon (in the main Outlook window).
If all went well, you should see this exact configuration:
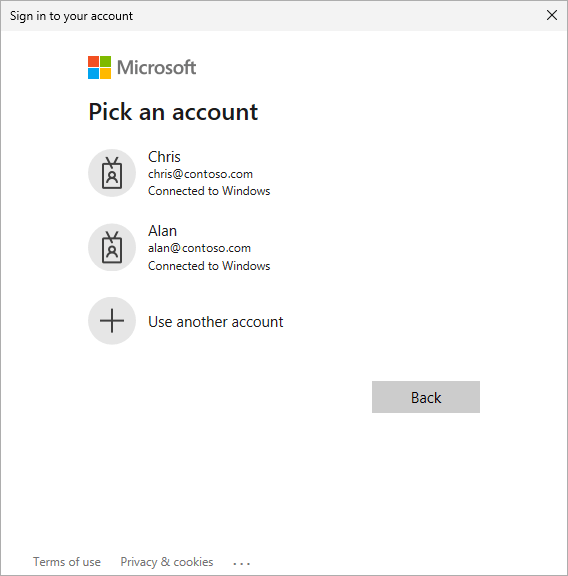
You can test the Attach2Cloud authentication by proceeding as follows:
Click any available (not greyed out) Clear cached credentials button if any.
Then click the Test button in the above selected section.
It will popup an authentication dialog (because it is the first time Attach2Cloud authenticates on this PC for this user).
You need to authenticate with the Attach2Cloud user account:
One you have authenticated, you should see Login succeeded! in the Attach2Cloud Options window:
Your Attach2Cloud users won't have to use this Attach2Cloud Options / Authentication Methods menu and panel.
The above authentication dialog will be displayed automatically the first time Attach2Cloud tries to authenticate after their registry parameters have been updated.
The only thing you have to do is to deploy the registry parameters contained in the REG file generated by A2C-EncryptAADSSOParameters.exe to your users' PCs (see next section).
9. Deploying your Attach2Cloud Entra application parameters
Your Attach2Cloud Entra application parameters must be deployed on the Attach2Cloud users' computers.
You can deploy them by yourself using Windows GPOs or any other way to push registry parameters on users' PCs.
Don't hesitate to contact us if you want us to activate an automatic online update installing your Attach2Cloud Entra application parameters at your installed Attach2Cloud users. Simply send us your registry file containing the encrypted parameters we'll deploy them.
We can also customize your Attach2Cloud setup packages to include your Attach2Cloud Entra application parameters.
Simply send us your registry file containing the encrypted parameters and we will update your Attach2Cloud setup package accordingly.
10. Ah, one or two last things before you close this tutorial!
In case you modified the PowerShell script Execution Policy, (in section 4), don't forget to restore the initial setting (if you followed our advice, you should have copied it in a Notepad).
To do so, simply run Powershell again and use the SetExecution -ExecutionPolicy again by passing the original setting, for example Restricted:
Set-ExecutionPolicy -ExecutionPolicy Restricted
And you can also delete the 2 files you copied in the Attach2Cloud folder (A2C-EncryptAADSSOParameters.exe and A2C-Register-v3.ps1), (in section 3), since they are only useful for the purpose of registering Attach2Cloud in Entra, you don't need them anymore.